Intro to ProtoPie Connect 4 of 7: Arduino Part 2 - Roll Your Own Sketch Code
Learn how to use ProtoPie Connect's Arduino plugin to direct access your Arduino project.


Introduction
In the previous lesson, I showed you how quick easy it is it connect your Arduino project in ProtoPie using Blokdots. But there were a couple of issues that we encountered. We were getting reverse button behavior — Blokdots reported 1 when the button was unpressed and 0 when pressed — and when we turned our encoders too quickly, we were seeing a problem known as “bounce,” where the encoder sometimes counted down when it should be counting up, or counted up when it should be counting down.
We were able to work around the first problem by reversing the connections to the ground (GND) and voltage (+) pins on the encoder, and for the second problem we were careful not to turn the encoder knobs too quickly. Both of these problems (and many others) can be properly handled if you write your own Arduino code.
But… Code is scary!!
Don't worry! You won’t need to write any code — you’ll be working with an Arduino script – called a "Sketch" – that I’ve already written. You'll just need to copy and paste. This lesson is not about learning how to write code. What this lesson will focus on is just what you need to know in order to get your Arduino working with ProtoPie Connect.
if, however, you are feeling adventurous and you'd like to try writing your own Sketches, know there are numerous examples online for writing Arduino code to get you started. In fact, the Sketch I wrote is largely based off of what I learned (ahem… copied…) from this article.
What you'll learn
In this tutorial we’ll cover the following:
- The specific code details you'll need to pay attention to for use with ProtoPie Connect
- Validate your code and upload it to your Arduino board
- Configure and enable the Arduino plugin in ProtoPie Connect
Time to complete: ≤15 minutes
What you'll need
- We’re using the same finished Pie as in the last lesson. Download it here:
https://cloud.protopie.io/p/35d69ddd96 - Have your Arduino circuit wired up like we did in the previous lesson.
- Download and install the Arduino software.
- Copy the following code:
// On/Off Switch Config
#define ON_OFF_SW 2
unsigned long ON_OFF_lastButtonPress = 0;

// Rotary Encoder 1 Config (Temperature Control)
#define TCTRL_DT 3
#define TCTRL_CLK 4
int TCTRL_currentStateClk;
int TCTRL_lastStateClk;

// Rotary Encoder 2 Config (Fan Control)
#define FCTRL_DT 6
#define FCTRL_CLK 7
int FCTRL_currentStateClk;
int FCTRL_lastStateClk;


void setup() {

  // Set On/Off Switch input
  pinMode(ON_OFF_SW,INPUT_PULLUP);

  // Set temperature control encoder pins as inputs
  pinMode(TCTRL_CLK,INPUT);
  pinMode(TCTRL_DT,INPUT);

  // Set fan control encoder pins as inputs
  pinMode(FCTRL_CLK,INPUT);
  pinMode(FCTRL_DT,INPUT);

  // Setup Serial Monitor
  Serial.begin(115200);

  // Read the initial state of the encorder CLK pins
  TCTRL_lastStateClk = digitalRead(TCTRL_CLK);
  FCTRL_lastStateClk = digitalRead(FCTRL_CLK);


}

void loop() {

  /*
   * Climate Control ON/OFF
   */
  int onOffButtonState = digitalRead(ON_OFF_SW);
  //If we detect LOW signal, button is pressed
  if (onOffButtonState == LOW) {
    //if 50ms have passed since last LOW pulse, it means that the
    //button has been pressed, released and pressed again
    if (millis() - ON_OFF_lastButtonPress > 50) {
      Serial.println("ON_OFF");
    }

    // Remember last button press event
    ON_OFF_lastButtonPress = millis();
  }


  /*
   * Temperature Control
   */
  TCTRL_currentStateClk = digitalRead(TCTRL_CLK);

  // If last and current state of Temperature Control CLK are different, then pulse occurred
  // React to only 1 state change to avoid double count
  if (TCTRL_currentStateClk != TCTRL_lastStateClk  && TCTRL_currentStateClk == 1){

    // If the DT state is different than the CLK state then
    // the encoder is rotating CW so increment
    if (digitalRead(TCTRL_DT) != TCTRL_currentStateClk) {
      Serial.println("TEMP_UP");
    } else {
      // Encoder is rotating CCW so decrement
      Serial.println("TEMP_DOWN");
    }
  }

  // Remember last Temperature Control CLK state
  TCTRL_lastStateClk = TCTRL_currentStateClk;


  /*
   * Fan Control
   */
  FCTRL_currentStateClk = digitalRead(FCTRL_CLK);

  // If last and current state of Temperature Control CLK are different, then pulse occurred
  // React to only 1 state change to avoid double count
  if (FCTRL_currentStateClk != FCTRL_lastStateClk  && FCTRL_currentStateClk == 1){

    // If the DT state is different than the CLK state then
    // the encoder is rotating CW so increment
    if (digitalRead(FCTRL_DT) != FCTRL_currentStateClk) {
      Serial.println("FAN_UP");
    } else {
      // Encoder is rotating CCW so decrement
      Serial.println("FAN_DOWN");
    }
  }

  // Remember last Fan Control CLK state
  FCTRL_lastStateClk = FCTRL_currentStateClk;


  // Put in a slight delay to help debounce the reading from the encoders
  delay(2);

}- Paste this code into your Arduino software window.

- Import the Pie file into ProtoPie Connect and preview it in your browser.
Let’s do this!
Once you have everything ready, just follow along with the video below.
Reference
In the video I point out two important things you need to remember when writing an Arduino Sketch for use with ProtoPie Connect. I’ll leave these two details below for your reference:
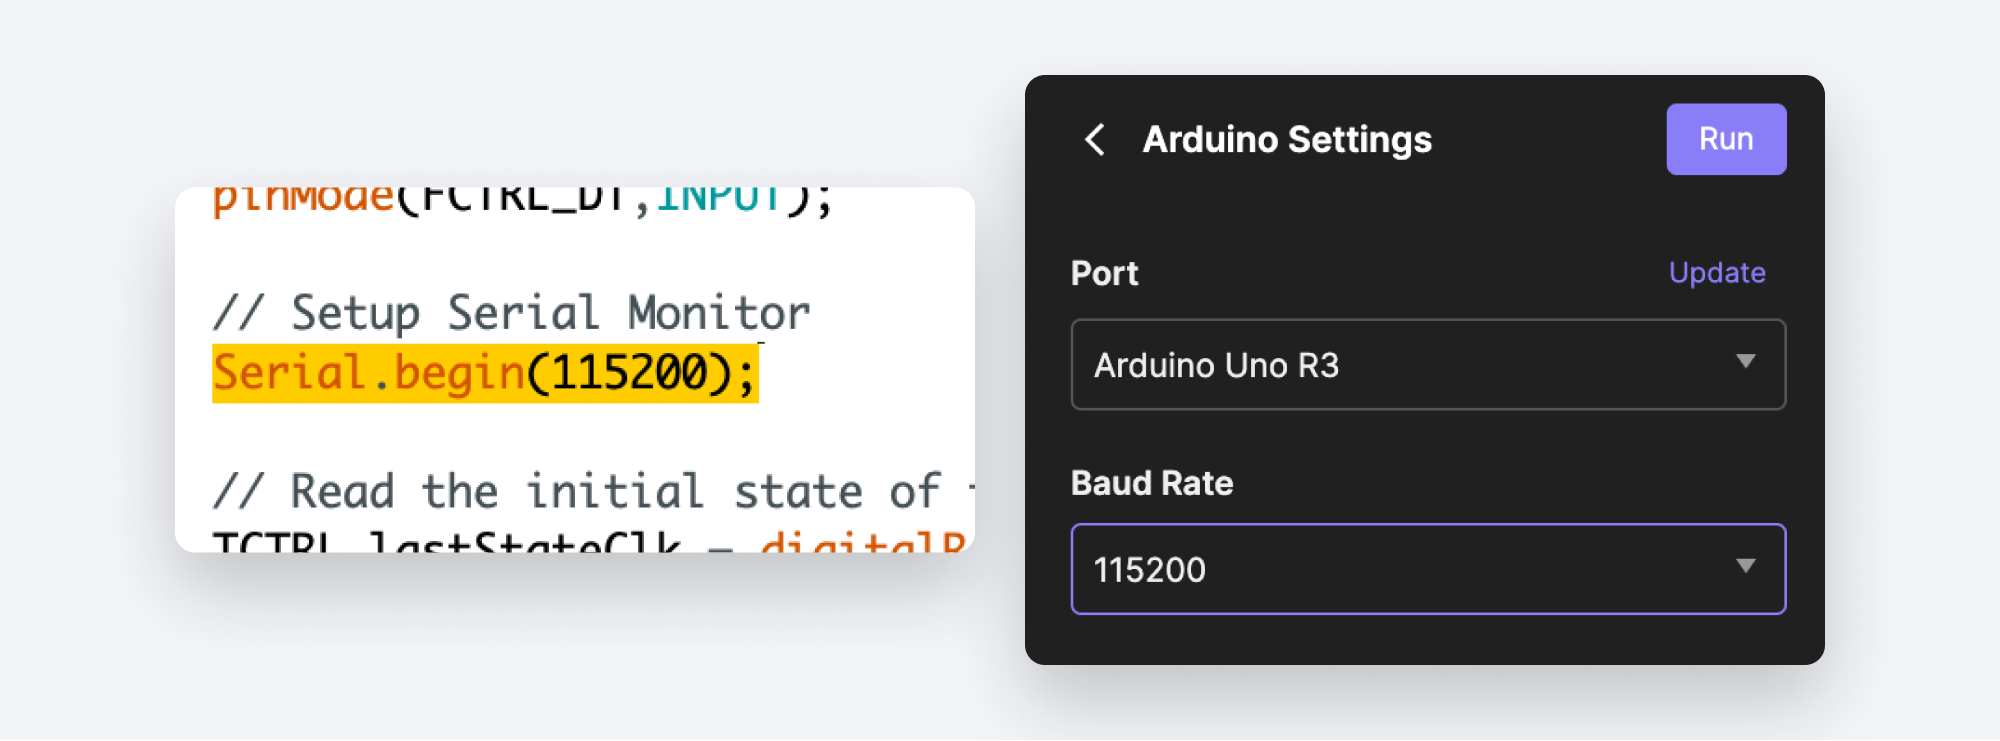
Correctly set the baud rate
The baud rate (i.e., how frequently the serial connection is checked for updates) you select in Connect’s Arduino plugin needs to match what you specified in your code.
.png?fm=webp)
Sending messages to ProtoPie Connect
ProtoPie Connect looks for messages written to the serial connection, so you use Serial.print() and Serial.println() in your code to send messages back to Connect.
For a message without a value, just print the message out to the serial connection like so:
Serial.println(<message name>), e.g.,Serial.println("TEMP_UP");
For a message with a value, you need to separate the message name and the value with two pipe (|) characters.
- e.g.,
Serial.println("SET_TEMP||21");
ProtoPie Connect will recognize this pattern and receive the message SET_TEMP with the value 21.
If you are supplying a variable as the value for the message, in Arduino code you can’t build the message in one line. For example, this won’t work:
Serial.println("SET_TEMP||" + temp);
You need to build this in two lines of code, using Serial.print() for the first part, and Serial.println() for the second.
- e.g.,
Serial.print("SET_TEMP||");
Serial.println(temp);
The difference between the two is Serial.print adds whatever you specify to the current line in the serial connection, while Serial.println writes to the serial connection AND adds a Return character to the end, signifying the end of the line or, from ProtoPie Connect’s perspective, a sent message.
ProtoPie Connect waits until a Return character has been output to the serial connection before acting on the message. In this way you could programmatically build up your message in several parts by issuing a number of Serial.print() commands before issuing the final Serial.println() command, signifying the completed message to ProtoPie Connect.
- e.g.,
Serial.print(message);
Serial.print(”||”);
Serial.println(value);
That's it! In Intro to ProtoPie Connect 5 of 7: Interaction with the Logic G29, we'll show you how to create a true multi-screen dashboard experience.


