Prototyping an Auto-Formatted Input Field
Learn how to prototype an auto-formatted input field with ProtoPie. We will walk through all of the required steps to implement this.


Introduction
Input fields are essential elements that collect various types of information—requiring different formats and character limits (e.g. phone numbers, names, search terms, etc.)
ProtoPie makes it easy to prototype an input field that automatically detects when the user's input meets specific conditions and applies formatting requirements through a simple, custom formula. You may optionally challenge yourself to learn how to store user input into variables to simplify your workflow.
What you'll learn
- Create a variable to store the input text length (Recommended Step)
- Format the input text using detect and condition
- Use a formula to limit the text length
- Repair the delete logic using detect and condition
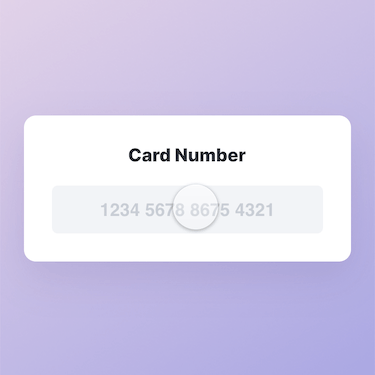
In the end, you’ll be able to make something like this!
Step by step instructions
1. Create a variable to store the input text length (Recommended Step)
In order to make ProtoPie auto-format this input field, we'll need to know the input text length at all times. A quick way to streamline this workflow is to create a custom variable to detect the input text length value.
💡 How could a variable make our workflow easier?
Variables can store values or formulas that are repeatedly referenced in your prototype. Instead of constantly retyping all of that information, you can just type in the variable's name to accomplish your goal.
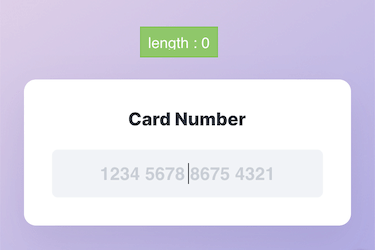
1. On the bottom left panel, click the '+' icon to create a new variable For This Scene. Go ahead and rename the variable to length for good organization practice.
2. In the property panel, check Use Formula. (This feature is only available for Variables For This Scene)
3. The formula we will store in this variable is length('Input'.text) It will constantly return the number of characters within the input layer.

💡 length(): This is a predefined text function that tells ProtoPie to count the number of characters that are detected from a text string.
length(source:TEXT)→ NUMBER
4. Toggle on the debug feature for the new variable. Let's check it in the preview window.

2. Format the input text using detect and condition
1. Add a Detect trigger to the input. Choose to detect its Text in the properties panel.

2. Add a Condition inside the Detect trigger. In the property panel, choose Formula. The formula we will use here is length('Input'.text), or simply type in length. It returns the number of characters of the input.
For this condition, we set the length('Input'.text) = 4 , or simply type length = 4

3. Add a Text response to the Input layer and use a formula in the text field.
The formula we use here is 'Input'.text + " "
We are adding a space and a Zero Width Non-Joiner (ZWNJ) after the text we have. You can directly copy this formula to your studio (it includes the ZWNJ). Or you can copy a ZWNJ here.
💡 Why add a ZWNJ and not another Space character?
A ZWNJ adds another character count without the visual addition of another Space character. For this Card Number format, we only require one Space character (visually) between a string of 4 numbers. To maintain this format requirement and have the Delete logic work—which we will get to later in the later steps of the article—we need an additional character that does not add visual space.

4. We need to add the same Text response under the specified conditions displayed below. To check if ProtoPie is detecting the text length correctly, you can use the debug feature to display the variable's value on your preview window.

Repeat the previous step, and use the same formula ('Input'.text + " ") in the Text responses for each condition. This will tell ProtoPie to insert a space right after the Input's text length = 4, 10, and 16
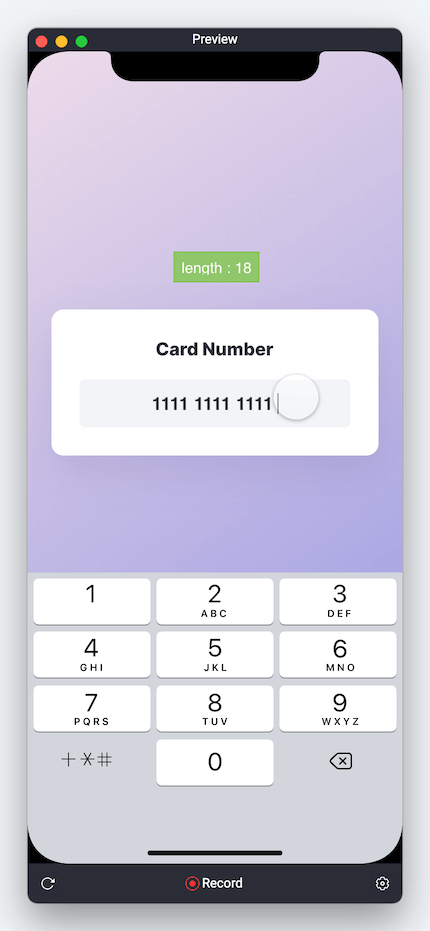
3. Use a formula to limit the text length
In this use case example, the max length of the text should be 22. When the text length reaches 22, no more characters should be allowed to be typed in. We need to use a formula to make it happen.

1. Add another condition when the Input layer's text length (or 'length') ≥ 22

2. Similarly, under this condition, we also give the Input layer a Text response and use a formula. The formula we use here is left('Input'.text,22)

💡 left(): left() is a predefined text function that tells ProtoPie to extract a part of a text from the left side based on a specific number of characters. In this case, ProtoPie extracts the first 22 characters starting from the left of the Input text layer.
left(source:TEXT,count:NUMBER)→ TEXT
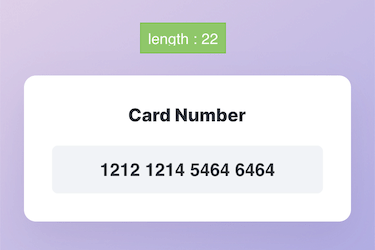
3. Let's check in the preview window. When the length reaches 22, no more characters can be typed.
4. Repair the delete logic using detect and condition
At this point, try to delete the last four characters. You'll notice that when we try to delete further than the last four characters, the length count goes down to 17, then it jumps back to 18.
This is because we first set the 'Input'.text + " " formula response when the condition when the text length is 16. Once the character count hits 16, the space and ZWNJ get added immediately so the text length instantly becomes 18 again.
To make the delete logic functional again, we need to create another set of delete-oriented conditions that work around the formatting conditions we established.
We'll first add a condition when the text length is 17. At this condition, let's trim the text length to 15.

1. Add a new Detect trigger to the input again.

💡 Why create a new 'Detect' trigger?
Using a separate trigger for the two different purposes (Enter and Delete), gives a more clear hierarchy. You could skip this and continue using the same detect trigger as before, but it may get messy.
2. Set the first condition as the text length = 17

💡 Why set the condition when text length = 17?
Since we already have a condition that triggers the insertion of two characters once the text length reaches 16, we have to delete two extra characters once we get down to 17 characters in order to not trigger the insertion response. This means that when someone is deleting and reaches the 17 character mark, the prototype will delete the text down to 15 characters.
This deletes the space character and ZWNJ used for the input formatting.
3. Add a Text response for the Input layer within this condition.
We will use a different formula in this text response. The formula we use here is left('Input'.text,15)

💡 What should I expect the result of this formula to be?
This new formula tells ProtoPie to extract the first 15 characters of the "Input" text layer, starting from the left, once the character limit hits 17. This pushes the character count past 16, avoiding the Enter trigger and allowing you to delete the text further. Try previewing your prototype and see its response when you delete down to 17 characters.
4. Add a condition when the text length is 11. At this condition, let's trim the text length to 9.

This step is similar to the previous one.
- Condition:
length('Input'.text) = 11 - Text:
left'Input'.text,9)
5. Add another condition when the text length is 5. At this condition, let's trim the text length to 3.

Also repeat the previous step using the following values
- Condition:
length('Input'.text) = 5 - Text:
left('Input'.text,3)
6. Let's check in the preview window.
You did it!
Awesome work! You've learned how to create a formatted input field element, implement a character limit, and made sure that the Delete logic properly functions—allowing your users to change their input text. You've also maybe even experimented with using a variable to simplify your workflow.
This was a lot to learn and do all at once, so be proud of your work!
Continue experimenting with these methods in ProtoPie, and create even more realistic experiences. We would love to see your crazy experiments. Create your own prototype and share it on Twitter or Instagram with #MadeWithProtoPie


