How to Add Real Data to Your Prototypes
Learn how to seamlessly integrate data like the weather or Spotify API into your prototypes.
.jpeg?fm=webp)
.jpg?fm=webp)
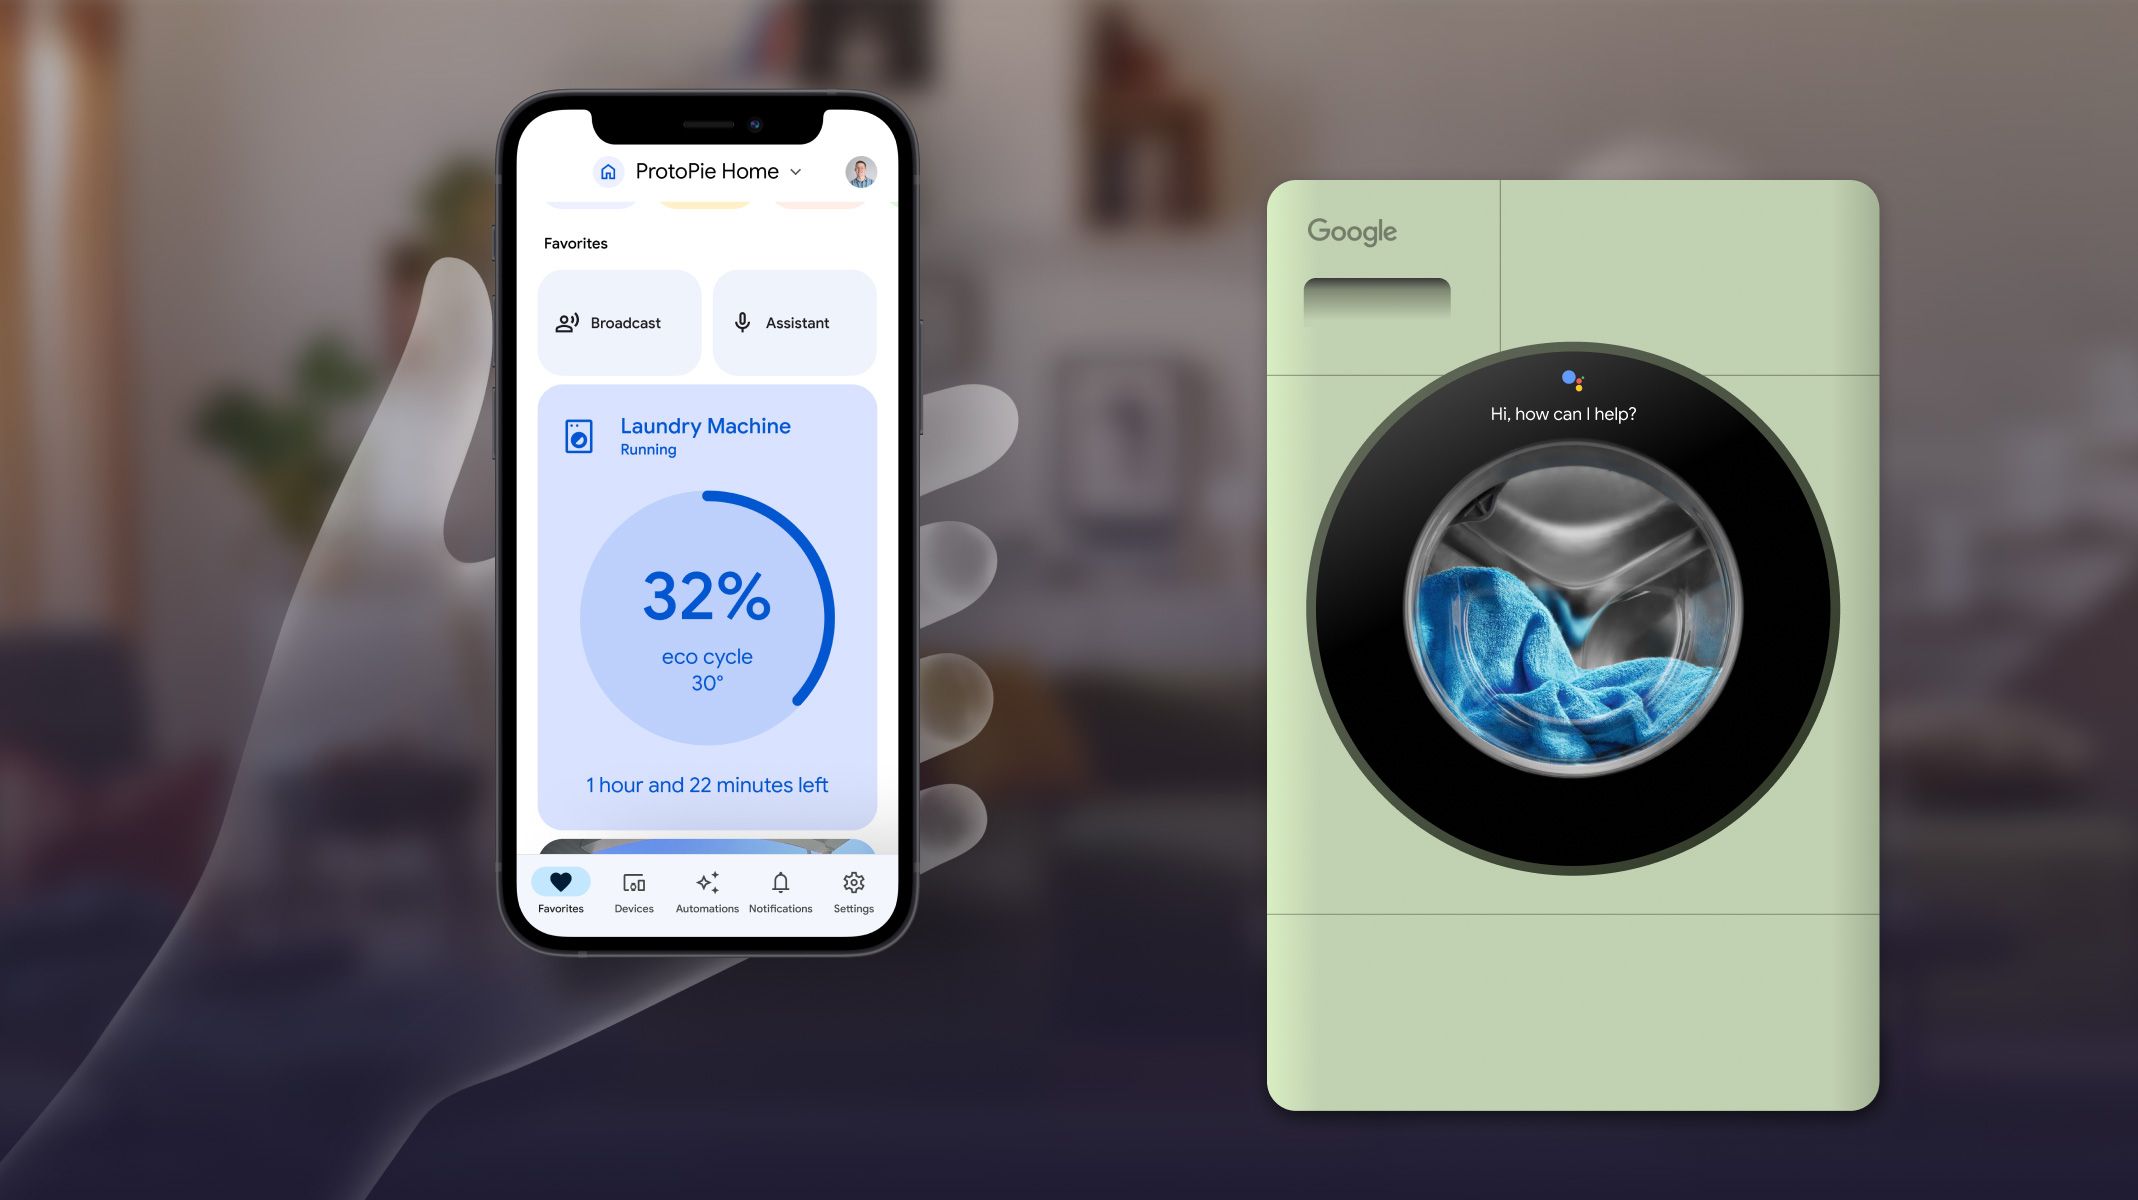
In this article, we’ll show you the possibilities of connecting external data sources to your prototypes for a realistic and immersive testing experience. You can achieve this with ProtoPie Connect on the Enterprise plan, and the new parseJson function.
In this tutorial, we'll integrate a weather API and the Spotify API to incorporate real data into our user interface. But the options are limitless!
What exactly does API mean? API stands for Application Programming Interface, which basically means you can connect to another application and request certain information from it.
Check out the demo video below to see what the end result could look like!
Are you interested in the newest API features for prototyping? Then sign up to get API feature news and tips about prototyping!
TL;DR
2. Create the Python bridge app
2.1. Understanding the bridge example
2.2. Next, let's get the weather data!
2.3. Send the data to ProtoPie
2.5. Use the music data in your prototype
That’s it! 🥧 You successfully added real data to your prototype!
Resources
In this tutorial, we are using the following resources. You can build along as the article goes, or download the final files and see how it works!
- Tesla weather app Pie
- Python code below
Note: Python 3.9 is required to install the script (newer versions lead to an error you can’t work around, so if you're using a newer version, please try downgrading to 3.9)
import socketio
import fileinput
import sys
import requests, datetime
import json

# Change the address below to yours
address = 'http://localhost:9981'

io = socketio.Client()

months = ['January', 'February', 'March', 'April', 'May', 'June', 'July', 'August', 'September', 'October', 'November', 'December']

def get_access_token():
    response = requests.post('https://accounts.spotify.com/api/token', {
        'grant_type': 'client_credentials',
        'client_id': '{paste your client id here}',
        'client_secret': '{paste your client secret here}',
    })
    return response.json()['access_token']

def get_top_tracks(country_code):
    access_token = get_access_token()
    endpoint = f'https://api.spotify.com/v1/browse/categories/toplists/playlists?country={country_code}'

    playlists = requests.get(endpoint, headers={'Authorization': f'Bearer {access_token}'}).json()['playlists']['items']

    top_50_playlist = next((p for p in playlists if p['name'].startswith('Top 50')), None)

    playlistName = ""

    if top_50_playlist is None:
        top_50_href = playlists[0]['tracks']['href']
        playlistName = playlists[0]['name']
    else:
        top_50_href = top_50_playlist['tracks']['href']
        playlistName = top_50_playlist['name']


    tracks = requests.get(top_50_href, headers={'Authorization': f'Bearer {access_token}'}).json()['items']

    musicData = {
        'playlistName': replace_whitespace(playlistName),
        'topSongs': []
    }

    for i in range(8):
        title = replace_whitespace(tracks[i]['track']['name'])
        artist = replace_whitespace(tracks[i]['track']['artists'][0]['name'])
        musicData['topSongs'].append({"title": title, "artist": artist})

    print("Music data:")
    print(json.dumps(musicData, indent=1, ensure_ascii=False))
    return(json.dumps(musicData, ensure_ascii=False))

@io.on('connect')
def on_connect():
    print('[SOCKETIO] Connected to server')
    io.emit('ppBridgeApp', { 'name': 'python' })

@io.on('ppMessage')
def on_message(data):
    messageId = data['messageId']
    messageValue = data['value'] if 'value' in data else None

    if messageId == "getWeatherAndMusicData":
        location = messageValue
        locationUrl = "http://api.openweathermap.org/geo/1.0/direct?q=" + location + "&limit=5&appid={Paste-your-API-key-here}"
        locationData = requests.get(locationUrl).json()
        print(locationData)

        country = str(locationData[0]['country'])
        latitude = str(locationData[0]['lat'])
        longitude = str(locationData[0]['lon'])

        print(location + ", " + country + " has latitude " + latitude + " and longitude " + longitude)

        weatherUrl = "https://api.openweathermap.org/data/2.5/weather?lat=" + latitude + "&lon=" + longitude + "&appid={Paste-your-API-key-here}"
        weatherData = requests.get(weatherUrl).json()

        timeUTC = datetime.datetime.utcnow().timestamp()
        timeLocal = datetime.datetime.fromtimestamp(timeUTC + weatherData['timezone'])
        timeData = {"localtime": {"year": timeLocal.strftime("%Y"), "month": months[int(timeLocal.strftime("%m"))], "day": timeLocal.strftime("%d"), "hour": timeLocal.strftime("%H"), "minute": timeLocal.strftime("%M") }}

        weatherData.update(timeData)
        print("Weather data:")
        print(json.dumps(weatherData, indent=1))

        io.emit('ppMessage', {'messageId':'weatherData', 'value': str(weatherData).replace("'", "\"")})
        musicData  = get_top_tracks(country)
        io.emit('ppMessage', {'messageId':'musicData', 'value': musicData})

def replace_whitespace(obj):
    return obj.replace('\u00a0', ' ').replace('\t', ' ').strip()

io.connect(address)
1. Start the local server
The main thing we need to set up to connect a Python script to ProtoPie is Socket.io.
Once you start ProtoPie Connect, it will start hosting a server on the address that you can see in the bottom left. Socket.io allows us to connect a Python script to that local server, and enables us to send and receive messages through it!

2. Create the Python bridge app 🐍
2.1. First, we need to understand the bridge example
The template for a Python application connected to ProtoPie can be found here, among various other bridge apps built by ProtoPie to help you get going as quickly as possible!
If this sounds too complicated, it is possible to compile the Python bridge app into a plugin for ProtoPie connect. We covered this simpler alternative in our ProtoPie Connect course.
Make sure to take a look at the final two lessons. They focus on creating custom bridge apps and compiling them into plugins.
The setup
At the top of the page, there are first some imports to get the relevant packages for the program to work correctly.
Next, there is the address that the program will try to connect to. If you’re running ProtoPie Connect on the same machine as the Python program, you don’t have to change it.
And lastly, we declare the socket, so we can interact with it.
import socketio
import fileinput
import sys

address = 'http://localhost:9981'
io = socketio.Client()
Setup of the Connect function
After the setup, there is an on_connect function, which is called whenever the Python program connects to the server.
It will emit (send to the server) a message to confirm the connection was successful.
@io.on('connect')
def on_connect():
    print('[SOCKETIO] Connected to server')
    io.emit('ppBridgeApp', { 'name': 'python' })
Receiving a message
After the on_connect function, there is a on_message function. This is the place where you want to add anything that the program should do when it receives a specific message.
@io.on('ppMessage')
def on_message(data):
    messageId = data['messageId']
    value = data['value'] if 'value' in data else None
    print('[SOCKETIO] Receive a Message from connect', data)
Connecting
Now the program will actually start the connection with the address provided earlier.
io.connect(address)Sending a message
The default bridge app also comes with the functionality for you to type a message ID and value in the terminal, and emit it to the server of ProtoPie connect.
while 1:
  messageId = input('Please input a message id: ')
  value = input('Please input a value: ')

  print('\tSend ', messageId, ':', value, ' data to Connect');
  io.emit('ppMessage', {'messageId':messageId, 'value':value})
Try it out!
Make sure you have Python installed. Then simply open a terminal in the folder where you saved the client.py file by right-clicking it and selecting “New Terminal at Folder”.

Run the pip3 install -r requirements.txt command to install the relevant packages and then run python3 client.py to start the program.
You’ll be asked to input a message id and a value, press Enter to confirm.
If everything went well, you’ll be able to see the message and its value in ProtoPie Connect!

2.2. Next, let’s get the weather data!
Now, to get the weather data, we need to send a message called "getWeatherAndMusicData" with a location as its value. Our Python program will then return the weather and music data at that location.
Isn't it amazing what we can accomplish with API integrations?
Get prototyping tips from a specialist
Get the latitude and longitude data
We want to use our application to get the weather data of a specific location. So first, we will use the Geocoding API to get the latitude and longitude of a city.
Please check out their documentation on how to get an API Key, which is basically a unique key for you to access the API. You need to put that key into the code where it says {API key}.
In our new program, we start off by checking if the message we received from ProtoPie is equal to “getWeatherAndMusicData”.
If that is true, then that means ProtoPie is trying to get data, so we assign the messageValue to a variable called location.
Then, we create a variable called locationUrl and paste in the value we received from ProtoPie in the middle of this URL.
Next, use requests.get(locationUrl).json() to get the geo data of that location.
@io.on('ppMessage')
def on_message(data):
    messageId = data['messageId']
    messageValue = data['value'] if 'value' in data else None

    if messageId == "getWeatherAndMusicData":
        location = messageValue
        locationUrl = "http://api.openweathermap.org/geo/1.0/direct?q=" + location + "&limit=5&appid={API key}"
        locationData = requests.get(locationUrl).json()

				print(locationData)
This will return a long message containing loads of data, but all we care about is the latitude, longitude and country.
If you’re ever confused by the legibility of this, so are we, just simply paste it into a JSON formatter to get an overview.
We can use the following syntax to access the values inside this message.
country = str(locationData[0]['country'])
latitude = str(locationData[0]['lat'])
longitude = str(locationData[0]['lon'])

print(location + ", " + country + " has latitude " + latitude + " and longitude " + longitude)
The print function will output Amsterdam, NL has latitude 52.3727598 and longitude 4.8936041 which is exactly what we need for the next step, getting the weather data!

Get the weather data
Now, we will use the Weather API in the same fashion, we compose a URL with the latitude and longitude we just retrieved, and then use the requests.get(weatherUrl).json() function to get the weather data of that location.
weatherUrl = "https://api.openweathermap.org/data/2.5/weather?lat=" + latitude + "&lon=" + longitude + "&appid={API key}"
weatherData = requests.get(weatherUrl).json()

print("Weather data:")
print(json.dumps(weatherData, indent=1))
This print will output loads of information that we just got from the weather API, such as the weather description, temperature, humidity, and much more!
The json.dumps(weatherData, indent=1) will just print the weatherData, but nicely indented to improve legibility 😉.

We also want to use the time at the location we sent, so we’ll use the following code to get the timezone from the weatherData and add that timeData to the weatherData.
timeUTC = datetime.datetime.utcnow().timestamp()
timeLocal = datetime.datetime.fromtimestamp(timeUTC + weatherData['timezone'])
timeData = {"localtime": {"year": timeLocal.strftime("%Y"), "month": months[int(timeLocal.strftime("%m"))], "day": timeLocal.strftime("%d"), "hour": timeLocal.strftime("%H"), "minute": timeLocal.strftime("%M") }}

weatherData.update(timeData)

print(json.dumps(weatherData, indent=1))
This will result in the following information being added to our weatherData.

Now, we simply need to emit it back to the socket server so ProtoPie can access the data.
The message ID is “weatherData” and the value is our data. We use the str(weatherData).replace("'", "\\"") function to convert our json data back into a string, and replace all the ' with \\" as this is what ProtoPie uses.
io.emit('ppMessage', {'messageId':'weatherData', 'value': str(weatherData).replace("'", "\"")})2.3. Send the data to ProtoPie
We can start off by sending “getWeatherAndMusicData” to ProtoPie Studio, with the value being the city that you want to get the data from.

Next, create a Receive trigger and assign the received data to a variable. Make sure the variable is set to Text.

We can use that variable in combination with the parseJson function to get any information from it that we like, and for example, replace the content of a text layer.
For more information about how to access data inside a Json object with the parseJson function, take a look at this Pie.

If we open this Pie in ProtoPie Connect and start it, we will get the following result.

As you can see, the Pie is sending “getWeatherAndMusicData” with value “Amsterdam” to ProtoPie Connect, and the Python bridge is returning “weatherData” with the json object as its value. The Pie is receiving this and taking the main weather description from it. Awesome!
2.4. Let's get the music data
After we emit the weatherData in our Python program, we add the following.
musicData  = get_top_tracks(country)
io.emit('ppMessage', {'messageId':'musicData', 'value': musicData})
This will call function called “get_top_tracks” with “country” as its parameter, and emit that to Socket server as “musicData” with as value the data it just received from the get_top_tracks function.
Get an access token
The get_top_tracks function starts with a call to yet another function called get_access_token.
def get_top_tracks(country_code):
    access_token = get_access_token()
As Spotify is a bit more complex than other APIs, we need to actually request a key on demand with a client ID and client secret. You can make a Spotify Developer account to get those credentials.
The get_access_token function will then return an access token from Spotify with the provided credentials.
Read more about the Spotify API.
def get_access_token():
    response = requests.post('https://accounts.spotify.com/api/token', {
        'grant_type': 'client_credentials',
        'client_id': '{paste your client_id here}',
        'client_secret': '{paste your client_secret here}',
    })
    return response.json()['access_token']
Get the raw music data
Back in the get_top_tracks function, we can use this access token to get our music data.
Note that we need to add the country code that we got from the Weather API to our Spotify endpoint so that we get the music data of that country!
def get_top_tracks(country_code):
    access_token = get_access_token()
    endpoint = f'https://api.spotify.com/v1/browse/categories/toplists/playlists?country={country_code}'

    musicData = requests.get(endpoint, headers={'Authorization': f'Bearer {access_token}'}).json()

		print(json.dumps(musicData, indent=1))
This will again provide you with a huge list of data.

Access the playlists
We are particularly interested in the top songs of that country.
We’ll start by adding ['playlists']['items'] to the request to get the playlists only.
Then, we’ll go through all the objects inside playlists and see if one has a name that starts with “Top 50”, we assign that object to a variable called “top_50_playlist”. If it cannot find any, it assigns it to None.
If top_50_playlist is equal to None, it means it couldn’t find the list for that country and it instead goes for the first playlist in the list, otherwise, it takes the top_50_playlist href (link) and name.
The top_50_href and playlistName variables will then be used to request an array of the tracks in that list.
playlists = requests.get(endpoint, headers={'Authorization': f'Bearer {access_token}'}).json()['playlists']['items']
top_50_playlist = next((p for p in playlists if p['name'].startswith('Top 50')), None)

playlistName = ""

if top_50_playlist is None:
	  top_50_href = playlists[0]['tracks']['href']
	  playlistName = playlists[0]['name']
else:
	  top_50_href = top_50_playlist['tracks']['href']
    playlistName = top_50_playlist['name']

	  tracks = requests.get(top_50_href, headers={'Authorization': f'Bearer {access_token}'}).json()['items']
Create a musicData object
Next, we create an object called musicData and assign “playlistName” to playlistName, and create an empty array called “topSongs".
musicData = {
    'playlistName': replace_whitespace(playlistName),
    'topSongs': []
}
We call a function called replace_whitespace on the playlistName as it can sometimes contain weird characters that ProtoPie doesn’t render properly. This function simply replaces those funky characters with a normal space and returns it.
def replace_whitespace(obj):
    return obj.replace('\u00a0', ' ').replace('\t', ' ').strip()
Get the top songs
Now, the first 8 song titles and artists will append to the empty topSongs array of the musicData.
After that, it prints it out. Again, please make sure it is using ASCII, we don’t want any weird characters in our Pie!
for i in range(8):
    title = replace_whitespace(tracks[i]['track']['name'])
    artist = replace_whitespace(tracks[i]['track']['artists'][0]['name'])
    musicData['topSongs'].append({"title": title, "artist": artist})

print("Music data:")
print(json.dumps(musicData, indent=1, ensure_ascii=False))
return(json.dumps(musicData, ensure_ascii=False))
This print will output the following; the object consisting of the playlistName and an array called topSongs filled with the first 8 songs of the Top 50 playlist at the location you provided.

2.5. Use the music data in your prototype
In our Pie, we can again assign this data to a variable and use it in our Pie however we like with the parseJson function.

3. Add everything to your UI

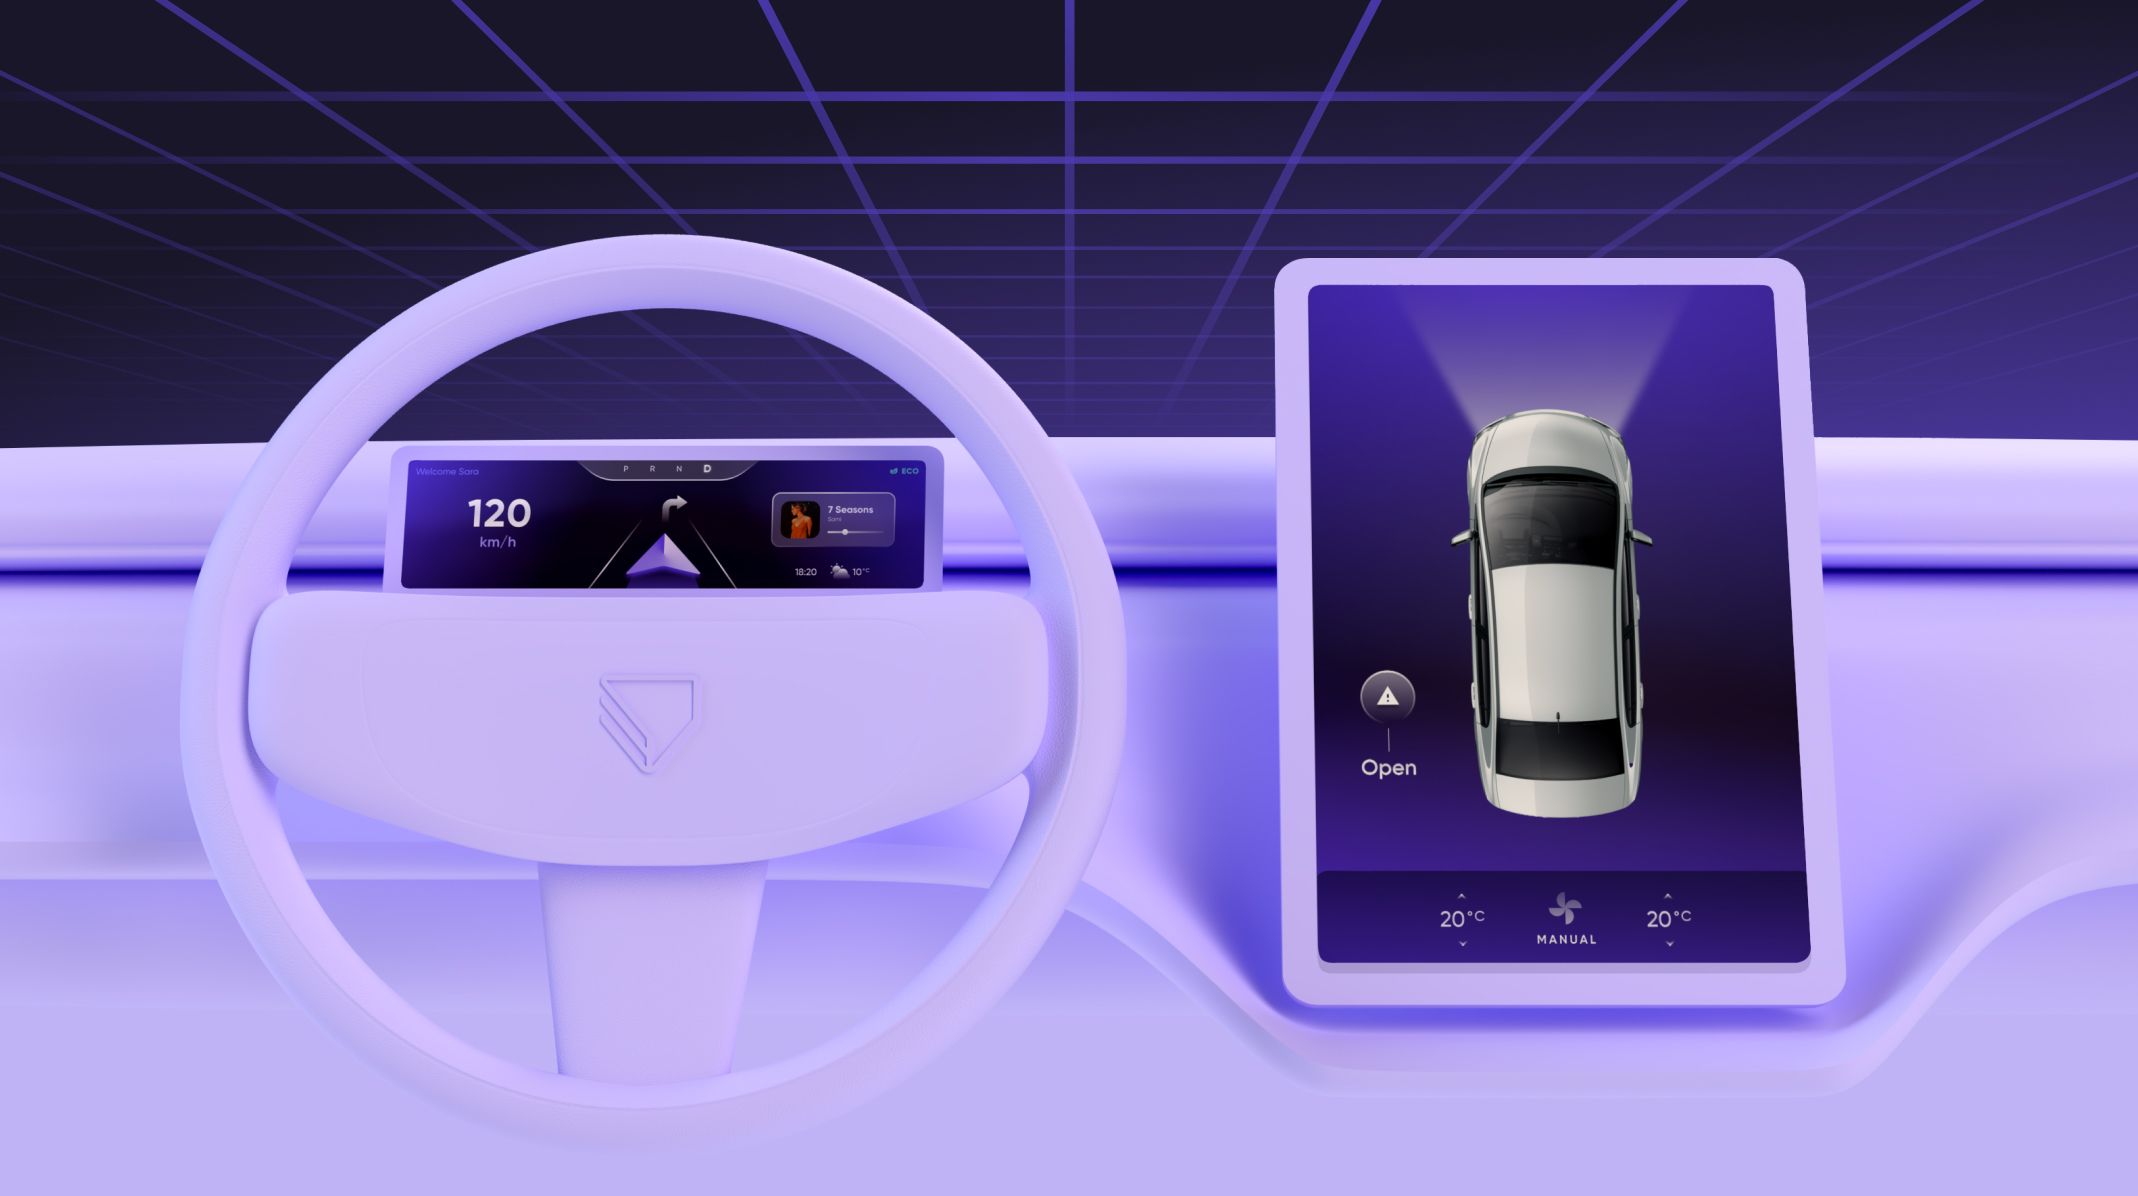
In our prototype, we use the weatherData and musicData in various ways, here are some examples of how to use them in the formula field in ProtoPie:
- The top right date and time is set using
parseJson(weatherData, "localtime.day") + " " + parseJson(weatherData, "localtime.month") + " " + parseJson(weatherData, "localtime.hour") + ":" + parseJson(weatherData, "localtime.minute") - The top centre location is set using
parseJson(weatherData, "name") + ", " + parseJson(weatherData, "sys.country") - The weather data is set using
format((parseJson(weatherData, "main.temp") - 273), "##") + "°C – " + upperCase(left(parseJson(weatherData, "weather.0.description"), 1)) + right(parseJson(weatherData, "weather.0.description"), length(parseJson(weatherData, "weather.0.description")) - 1).
Here we are taking the main temperature and subtracting it by 273 to get Celsius, and changing the first character of the description to an uppercase, cause it looks nicer. 🤷🏼♂️

- The weather icon is set using a code provided by the Weather API,
parseJson(weatherData, "weather.0.icon"). We assign the code to a variable and then detect change on it to show the icon set they provide here. We also use this code to control the various weather overlays by simply fading them in and out accordingly.

- We also have a variable called “mode” which is assigned to
right(parseJson(weatherData, "weather.0.icon"), 1). This is just the first character of the code which is either an “d” for day, or “n” for night. We can then use that variable to control our night mode and change our text color accordingly.

- For the playlist name, we use
parseJson(musicData, "playlistName") - For each of the songs, we change the text object of each title to
parseJson(musicData, "topSongs.0.title")and each artist toparseJson(musicData, "topSongs.0.artist")where the.0.changes to.1.,.2.etcetera. - We also assign a random color to the album covers when change is detected on the musicData variable, to fake the effect of updating the songs.
color(random(100,250), random(100,250), random(100,250))

That’s it! 🥧 You successfully added real data to your prototype!
Congrats, you made it all the way down! We’re super proud of you 😉. We hope this will help you in the future to think outside the box and make your Pies even more realistic and engaging.
Upgrade your prototyping with API integration
Get started with ProtoPie for free and explore all the possibilities to create realistic and immersive user experiences with the power of API integration.
Happy prototyping!
Get started for freeGet news and tips about our API features
.jpg?fm=webp)
.jpg?fm=webp)
